
Jack-o-Lantern Crochet Pattern
Hi Everyone!
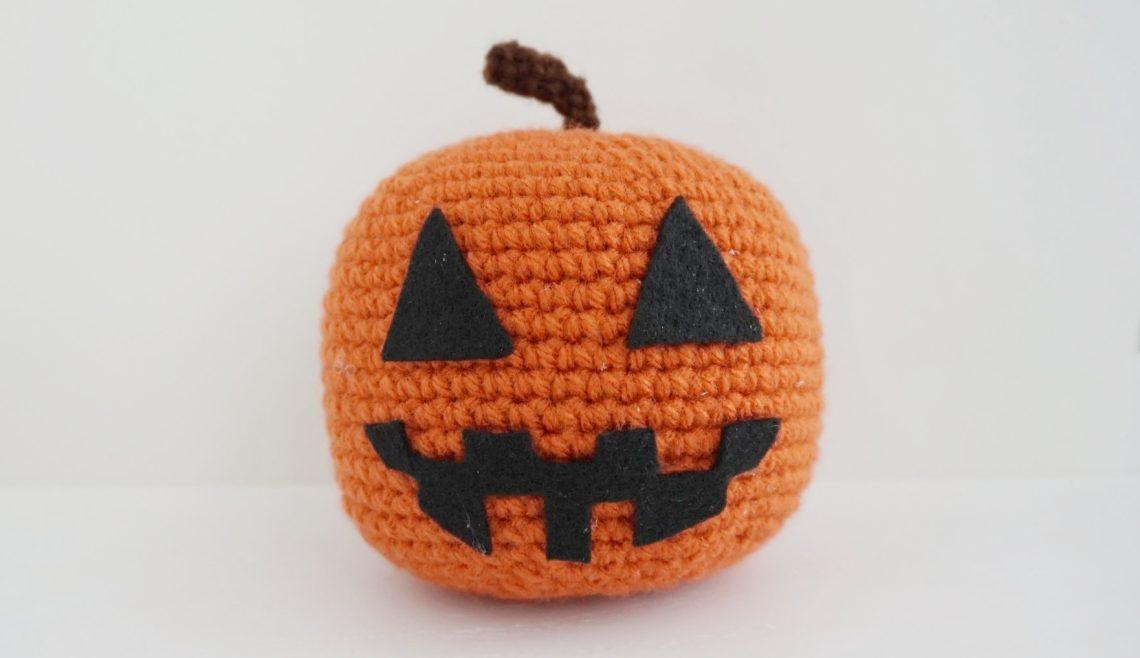
It is nearing the end of October and that means it is almost time for Halloween! I haven’t been trick or treating for many years now, but giving out candy and carving pumpkins into Jack-o-Lanterns is always fun. That is why I want to share with you a Jack-o-Lantern pattern that you can crochet and don’t have to scoop out all the seeds from the centre to make a face.
Here is the pattern:
Materials
4.00 mm (G) Hook
Loops and Threads Impeccable Yarn (Medium (4))
Scissors
Tapestry Needles
Stitch Marker
Black Felt Fabric
Abbreviations
SC – Single Crochet
MR – Magic Ring
ST – Stitch
SC2TOG – Single Crochet 2 Stitches Together
FO – Finish Off
CH – Chain
SLST – Slip Stitch
HDC – Half-Double Crochet
DC – Double Crochet
Pattern
Pumpkin
Round 1: 6 SC into MR (6)
Round 2: 2 SC into each ST (12)
Round 3: *1 SC, then 2 SC into the next ST* Repeat from * to * around (18)
Round 4: *1 SC in the next 2 STs, then 2 SC in next stitch* Repeat from * to * around (24)
Round 5: *1 SC in the next 3 STs, then 2 SC in next stitch* Repeat from * to * around (30)
Round 6: *1 SC in the next 4 STs, then 2 SC in next stitch* Repeat from * to * around (36)
Round 7: *1 SC in the next 5 STs, then 2 SC in next stitch* Repeat from * to * around (42)
Round 8: *1 SC in the next 6 STs, then 2 SC in next stitch* Repeat from * to * around (48)
Round 9: 1 SC in the next 7 STs, then 2 SC in next stitch* Repeat from * to * around (54)
Note: You can have more or less increases to make a larger or smaller pumpkin. For example, increasing another round after would create a larger pumpkin and increasing one less round would create a smaller pumpkin.
Round 10 – 22: SC around (54)
Round 23: *1 SC in the next 7 STs, then SC2TOG* Repeat from * to * around (48)
Round 24: *1 SC in the next 6 STs, then SC2TOG* Repeat from * to * around (42)
Round 25: *1 SC in the next 5 STs, then SC2TOG* Repeat from * to * around (36)
Round 26: *1 SC in the next 4 STs, then SC2TOG* Repeat from * to * around (30)
Round 27: *1 SC in the next 3 STs, then SC2TOG* Repeat from * to * around (24)
Round 28: *1 SC in the next 2 STs, then SC2TOG* Repeat from * to * around (18)
Round 29: *SC in the next ST, then SC2TOG* Repeat from * to * around (12)
Round 30: SC2TOG around (6)
FO. Weave in ends.
Stem Nubs (Make 2)
Round 1: 6 SC into MR (6)
FO. Leave long tail to sew finished nub to bottom or top of the pumpkin.
Alternate stem nubs: Attach brown yarn into the middle of the top of the pumpkin. Sew around the middle point of the pumpkin by sewing in and out of the pumpkin in the circular manner. Once the top nub is complete move the needle into the bottom of the pumpkin and repeat same steps as the top of the pumpkin. FO. Weave in ends.
Stem
Row 1: CH 8. SC into 2nd CH from hook and till end (7)
FO. Leave long tail to sew stem to the top of the pumpkin.
Eyes and Face
Using the black felt cut out a face for your jack-o-lantern and either sew or glue the pieces onto the pumpkin. I have included some shapes you can follow below, but you can make whatever face you want for your jack-o-lantern!


If you do not have any fabric felt, you can use some black yarn and sew a face into the pumpkin. This Jack-o-Lantern pattern can be adjusted to fit what you want it to look like. Making a scary or friendly Jack-o-Lantern is up to you!


Enjoy making your very own Jack-o-Lantern for your Halloween!
Ravelry Pattern Page: 
Thanks for visiting my blog! Check out my previous pumpkin crochet pattern here!
If you have any questions, please feel free to leave a comment below or email me at [email protected]
Take care,
Jessica


4 Comments
Kimberly Bower (gladeslibrarian)
I like that I can make the pumpkin without the facial features. Thanks!
Jessica
Hi Kimberly!
That’s a great idea! Thanks for stopping by!
-Jessica
Pumpkin Newborn Baby Crochet Hat Pattern
[…] That’s it! Enjoy making your own pumpkin hat! If you want to turn this pumpkin hat into a Jack-o-Lantern hat, you can follow the steps for the face from my Jack-o-Lantern pattern! […]
Pingback: