
Pumpkin Crochet Pattern
Hi Everyone!
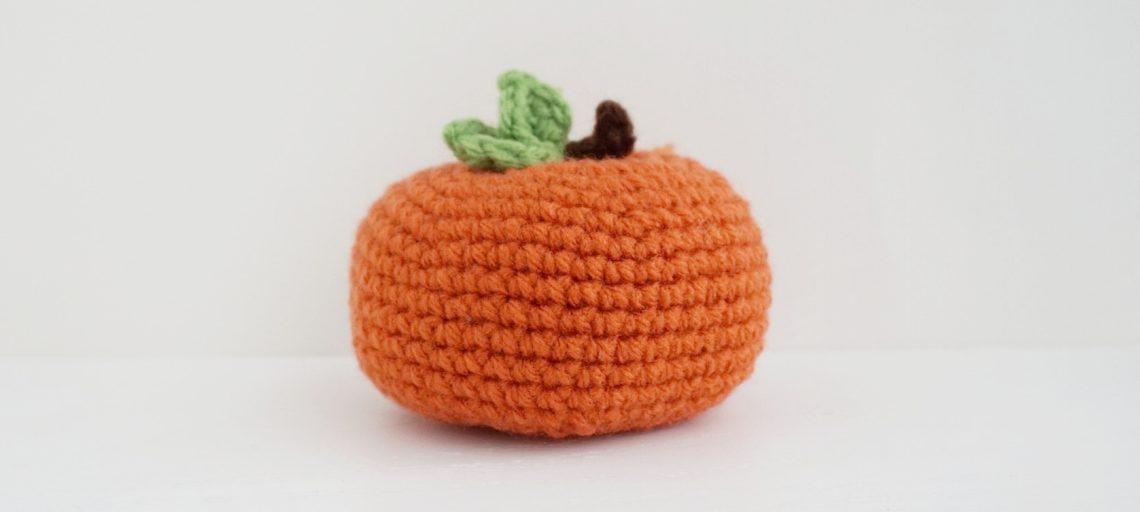
It is the time of year where there are lots of pumpkins ready to harvest and eat so I wanted to make a little pumpkin that you can use as decoration. You can adjust the pattern to make larger or smaller pumpkins. It is up to you!


Here is the pattern:
Materials
4.00 mm (G) Hook
Loops and Threads Impeccable Yarn (Medium (4))
Scissors
Tapestry Needles
Stitch Marker
Abbreviations
SC – Single Crochet
MR – Magic Ring
ST – Stitch
SC2TOG – Single Crochet 2 Stitches Together
FO – Finish Off
CH – Chain
SLST – Slip Stitch
HDC– Half-Double Crochet
DC – Double Crochet
Pattern
Pumpkin
Round 1: 6 SC into MR (6)
Note: Place Stitch Marker at the beginning of Round 2.
Round 2: 2 SC into each ST (12)
Round 3: *1 SC, then 2 SC into the next ST* Repeat from * to * around (18)
Round 4: *1 SC in the next 2 STs, then 2 SC in next stitch* Repeat from * to * around (24)
Round 5: *1 SC in the next 3 STs, then 2 SC in next stitch* Repeat from * to * around (30)
Round 6: *1 SC in the next 4 STs, then 2 SC in next stitch* Repeat from * to * around (36)
Round 7: *1 SC in the next 5 STs, then 2 SC in next stitch* Repeat from * to * around (42)
Round 8: *1 SC in the next 6 STs, then 2 SC in next stitch* Repeat from * to * around (48)
Note: If you want a smaller pumpkin, do less increases and if you want a larger pumpkin you can do more increases.
Round 9 – 15: SC around (48)
Round 16: *1 SC in the next 6 STs, then SC2TOG* Repeat from * to * around (42)
Round 17: *1 SC in the next 5 STs, then SC2TOG* Repeat from * to * around (36)
Round 18: *1 SC in the next 4 STs, then SC2TOG* Repeat from * to * around (30)
Round 19: *1 SC in the next 3STs, then SC2TOG* Repeat from * to * around (24)
Round 20: *1 SC in the next 2 STs, then SC2TOG* Repeat from * to * around (18)
Round 21: *1 SC in the next ST, then SC2TOG* Repeat from * to * around (12)
Round 22: SC2TOG around (6)
FO. Weave in ends.
Stem Nubs (Make 2)
Round 1: 6 SC into MR (6)
FO. Leave long tail to sew finished nub to bottom or top of the pumpkin.
Alternate stem nubs: Attach brown yarn into the middle of the top of the pumpkin. Sew around the middle point of the pumpkin by sewing in and out of the pumpkin in the circular manner. Once the top nub is complete move the needle into the bottom of the pumpkin and repeat same steps as the top of the pumpkin. FO. Weave in ends.
Stem
Row 1: CH 4. SC into 2nd CH from the hook and till end (3)
FO. Leave long tail to sew stem into the top of the pumpkin.
Big Leaf
Round 1: CH 4. SC into 2nd CH form hook. HDC into the next ST. DC into the last ST. SLST into same ST 3 times. DC onto the opposite side of same ST. HDC into the next ST. SC into the last ST. SLST into 1st ST.
FO. Leave long tail.
Small Leaf
Round 1: CH 4. SLST into 2nd CH form hook. SC into the next ST. HDC into the last ST. SLST into same ST 3 times. HDC onto the opposite side of same ST. SC into the next ST. SLST into the last ST. SLST into 1st ST.
FO. Weave in ends.

Leaves assembly: Using the long tail from the big leaf and sew the two leaves together with the big leaf under the small leaf slightly off center. Once the leaves are attached to each other, sew both leaves onto the top of the pumpkin.
FO. Weave in ends.
I hope you give this a try and please share them with me on instagram with the hashtag #fallpumpkincrochet
Ravelry Pattern Page: 
Thanks for stopping by my blog!
If you have any questions, please feel free to leave a comment below or email me at [email protected]
Take care,
Jessica


0 Comments
Real Me 86
Hi Jessica could you tell me where to get these crochet patterns. I am good at simply crocheting a blanket but would like to also get into some seasonal crafting as well.
Jessica
Hello!
Thank you for visiting my blog! You can find this pattern in this blog post 🙂 If you want to find other fall patterns you can try visiting ravelry or pinterest for some other ideas! Thanks again!
Real Me 86
It all seems very complicated to me these pumpkins I don’t know whether I will be able to do them.
Jessica
Hello!
I use many of the videos on Youtube to learn some new stitches and projects. Here is a link to a video that teaches you how to work in the rounds: https://www.youtube.com/watch?v=LTv45GlE134
Good luck!
Real Me 86
Thank you very much
Jessica
You’re welcome!
Jack-o-Lantern Crochet Pattern
[…] Thanks for visiting my blog! Check out my previous pumpkin crochet pattern here! […]